How do I print checks from iBank?
iBank offers completely customizable check printing so that you can either print checks on purchased check-stock paper or print checks entirely from scratch, on ordinary paper.
Check printing in iBank is done with user-configurable templates. Before you can print checks from an account, you must first configure a template to tell iBank how you want the checks to look. Each account stores its own template settings, so that you can use a different kind of check with each bank account.
Configure a check template
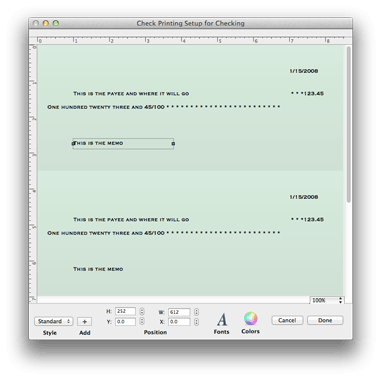
First, select the account you want to print checks from. Choose Account > Show Check Printing Setup to view the check printing setup window:
Set the page size and margins
Choose File > Page Setup and select the appropriate option from "Paper Size" to match the check stock you are using, and change the orientation if necessary. To adjust margin settings, you will need to create a custom paper size - click the "Paper Size" drop-down menu button and choose "Manage Custom Sizes." You can then use the available options to configure the page size and margin settings exactly as you need them. Click "OK" when you are done with the Page Setup options.
Choose a template style
Select the appropriate check style from the "Style" pop-up menu button at the bottom of the Check Printing Setup window. Choose the style that best matches the type of check you want to print:
- Standard: Use this template to print three checks to a page with the date, payee, note, and amount displayed on the check.
- Wallet: Use this template to print three checks to a page with the date, payee, note, and amount displayed on the check as well as on a detachable wallet tab on the left side of the check.
- Voucher: Use this template to print one check at the top of the page, and two check-sized receipts below. Date, payee, note, and amount information are displayed on each.
- Custom: Use this template if you want to print checks on plain paper. The date, payee, note, and amount are displayed in addition to your address, the payee's address, the bank's routing number, your account number, and the check number. Standard MICR numbers are displayed across the bottom of the check for automated processing.
iBank retrieves your address and the bank address automatically from the Mac OS X Contacts app. Your address is taken from the card designated as "My Card" in Contacts. iBank will search for your bank's address based on its name (as specified in the account inspector), so make sure you have a card in Contacts with the correct company name. The same applies to payees - iBank will search for your payee addresses based on their names. The routing number for your bank and your account number should be entered in the account inspector (double-click an account to show the inspector). When you print a custom check, the background gradient will be printed in addition to the text fields.
When printing checks using the "Custom" template, you must use plain paper - preprinted check stock can only be used with the other template styles. Check with your bank for any rules or regulations regarding printed checks; in some case, special MICR ink may be required. IGG Software does not guarantee that all banks will accept checks that you print yourself.
Set the check size
At the bottom of the Check Printing Setup window are two figures, 'H' and 'W', which represent the height and width of each check in pixels. Adjust these figures to match the size of your check stock - you may need to print a few test pages on blank paper until you are able to make sure things line up properly. Changing the paper size will cause the check size to automatically scale itself to fit three to a page.
Please note that the check height and width cannot exceed the paper size. If the check height and width are smaller than the paper size, you will see white space to the left and/or bottom of the checks in the Check Printing Setup window. If there is extra space, you can reposition the checks on the paper by adjusting the 'X' and 'Y' coordinates (horizontal and vertical position in pixels) at the bottom of the window.
Adjust field positions & font styles
Click any text field (e.g. payee name, transaction date, note) in the top-most check to select it. A box will appear around the field to indicate that it is selected:
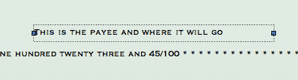
To reposition the field, click and drag to move it to a new location. As you are dragging it, two numbers will appear at the top-left of the field representing the X and Y coordinates (horizontal and vertical location) of the field. You will notice that the other checks on the same page automatically update to match the top check.
When using the "Voucher" check style, you can edit the middle check in addition to the top-most check. The top-most area controls how information will be printed on the check, while the middle area controls how the receipts will look.
To resize the field, click and drag the blue handle at either end of the selection box to make it bigger or smaller.
To change the font, size, shadow, etc. of the selected field, click the "Fonts" button at the bottom of the window and make modifications as necessary. To change the color of the text, click the "Color" button and choose a new color.
Add a payee address
If you want to display the payee's address on your checks, click the "+ Add" button next to "Style" and choose "Payee's Address" from the pop-up menu. A new field will be added to the template which you can reposition and style as necessary. To remove this field from the check template, select it and press 'Delete' on your keyboard.
Payee addresses are retrieved from the Contacts application. Make sure that you have an entry in Contacts that matches the payee for whom you are printing the check, otherwise iBank will not be able to display address information for that payee.
Add an image or logo
Drag and drop an image file from the Finder onto the top-most check:
![]()
Click and drag the image to reposition it; click and drag the handles around its border to resize it. Note that the image will appear in front of any text on the check and cannot be used as a background image. To remove an image from the template, click once to select it and press 'Delete' on your keyboard.
Reset a template to the default setup
Choose a different selection from the "Style" menu, then change back to the one you were using. Your changes will be erased and the default template will be shown again.
Print checks from the register
Once you have finished configuring the check template, close the Check Printing Setup window. Select one or more transactions (Command-click to select multiple items in the account register) for which you want checks to be printed, then choose File > Print Checks for Selected Transactions.
Configure your printer settings as appropriate, then click "Print." Each transaction will be printed to a separate check. Depending on how you have your template configured, checks will typically print three to a page. If you only select one or two checks for printing, only one or two checks will print on the page.