How do I add and delete categories?
To add a category:
Click "Categories" in the source list. The right side of the main window will display a list of all categories that are currently available for use. Click the plus (+) button above the list, and a sheet will appear asking you to enter information about the new category:
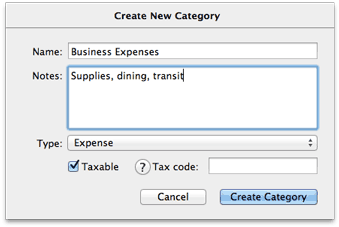
Type in a name for the category and a longer description, if desired. Choose whether the category is intended for tracking expenses or income by selecting the appropriate item next to "Type," and check the "Taxable" checkbox if you want to designate the category as being tax-related. Enter a tax code if desired, then click "Create Category" to add the new category to iBank's list. Read more about these options in Editing Category Properties.
You can also create a new category simply by typing it into a transaction's category field. When you save the transaction, iBank will ask you to configure the new category as described above.
To add a sub-category, first select the category you want the sub-category to fall under, then click the  button above the list. Enter the details of the new category, and it will be added to the list under the category you had selected. Read more about sub-categories in Organizing Category Hierarchy.
To delete a category:
Select the category you want to remove and click the minus (-) button at the bottom of category list, or press Delete on your keyboard. You will be asked to confirm that you want to remove the category. If the selected category has sub-categories, those will be deleted as well.
When you delete a category that has transactions assigned to it, iBank will present you with options for how to handle those transactions:
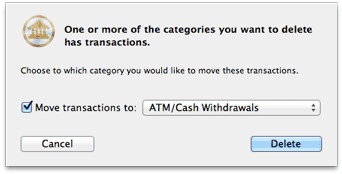
If you want to assign the transactions to a different category, check the box and select the desired category from the drop-down list. If you simply want to remove the category from any transactions to which it had been assigned, uncheck the box: the transactions themselves will not be deleted, but they will no longer have categories assigned to them. Click "Delete" to finish deleting the category, or click "Cancel" to keep it.