How do I group accounts?
 Account groups can be created to organize your accounts hierarchically.
Create an account group
Click the plus (+) button on the toolbar and choose "Add Account Group," or choose Account > New Account Group. Enter a name for the group and click "Create Account Group" to add it to the source list. Use drag and drop to move accounts in and out of the group. Click the small disclosure triangle next to the group's icon to hide or display the accounts within it.
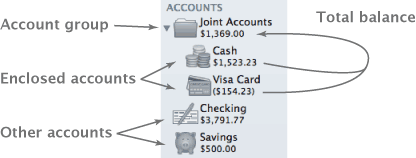
The amount that displays in the source list, below the group's name, represents the total balance of all the accounts within the group. Selecting the account group itself will display transactions from the enclosed accounts in the register. Transactions cannot be added when a group is selected, but you can edit and delete transactions. Any changes you make in the register will be applied to the transactions in their original accounts.
Like smart accounts, account groups do not keep running balances in the register. In place of the running balance, the name of the account to which each transaction belongs is displayed.
When you add accounts that use different currencies to a group, the group's total is displayed in the currency indicated in the summary pane. Any accounts that use a different currency will have their balances converted to the group's currency (using iBank's current exchange rates) before they are added to the total.
Delete an account group
Select the group and click the minus (-) button at the bottom of the source list, or choose Edit > Delete. A sheet will appear asking you to confirm that you want to permanently delete the group. All accounts contained within the group will also be deleted. To remove accounts from the group before deleting it, drag and drop them to another location in the source list.