How do I sync an iBank document with iBank Mobile?

iBank Mobile works as a stand-alone application to let you track your accounts and transactions on the go, or it can sync data with iBank for Mac via Bonjour Wi-Fi or a WebDAV server. You may sync multiple iPhones and iPod touches to a single iBank document, but a single device cannot sync with more than one iBank document. To use iBank Mobile, you will first need to purchase a copy of the app from the iTunes App Store and install it on your mobile device.
Back up data from iBank Mobile
The first time you sync, the data in iBank Mobile will be replaced with the data from iBank for Mac. If you used iBank Mobile as a stand-alone app and do not want to lose the data you recorded, you will need to export it to a QIF file and import it into iBank for Mac. On your mobile device, launch iBank Mobile, open the settings screen, scroll down, and tap "Export QIF." Select which accounts to export, then tap the "Send" button to email the QIF file to yourself.
Once the QIF file (or files, if you used multiple currencies) has been sent, check your email on the Mac and download the QIF file to your desktop. Launch iBank 5, create a new iBank document, and choose the "Import from Other Software" option to create a data file using the QIF file(s) on your desktop. Once the document setup is complete, you can proceed with the sync setup.
Configure a device for syncing
Make sure your iPhone/iPod is connected to the same wireless network as your Mac. Launch iBank Mobile, tap the settings button in the bottom left corner of the main screen, tap the button under "Syncing," then tap "Sync with iBank For Mac." Once you see a four-digit code appear on the screen, you are ready to configure iBank for Mac.
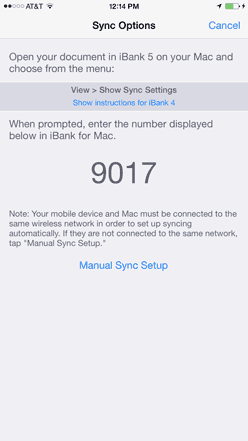
Launch iBank 5 on your Mac, open the document you want to sync, and select "Sync Settings" from the "Manage" section of the source list. If you do not see anything in this section, mouse over the "Manage" heading and click "Show," then select "Sync Settings." Click "Set Up New Device" to open the sync setup assistant:
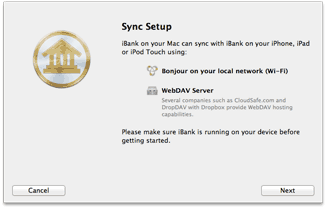
This screen provides a basic overview of the sync options available to you. Click "Next" to proceed:
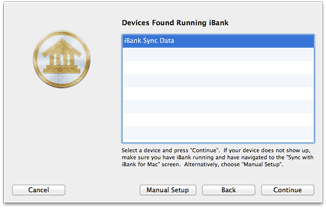
Your mobile device should appear in the list automatically. If it does not, check to make sure your iPhone/iPod and Mac are on the same wireless network, and that you can still see the four-digit code on your device screen. If you need to refresh the list, click "Back" and then "Next" again.
Select your mobile device from the list and click "Continue" to proceed:
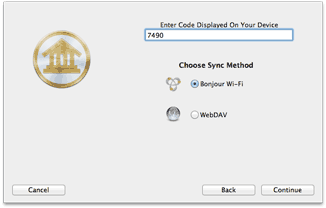
On this screen, enter the four-digit code that you see on your iPhone/iPod, then click the option you wish to use for syncing:
- Bonjour Wi-Fi: Click this button if you want to sync your data directly with your Mac whenever your mobile device and Mac are connected to the same wireless network. iBank 5 must be running on your Mac whenever you sync using this option.
- WebDAV: Click this button if you want to sync your data via a WebDAV server with a trusted SSL certificate. Cloudsafe and DropDAV are two third-party providers that offer iBank-compatible WebDAV storage.
Once you have chosen your preferred sync option, click "Next" to proceed. iBank may ask you to complete some additional configuration settings depending on your choice. If you chose WebDAV, you will need to enter the URL where the server can be accessed, as well as a username and password. Bonjour Wi-Fi does not require any additional configuration. Once this step is complete, you will see your iPhone/iPod added to iBank's device list.
Add a device manually
If you are syncing via WebDAV and cannot connect your mobile device to the same wireless network as your Mac, you can still configure the connection manually. When you get to the list of available devices, click "Manual Setup." Enter a name for the sync connection and choose which mobile app you are syncing with. In the box below, enter the full URL for the WebDAV server, along with the username and password needed to access the server. When you click "Done," iBank will attempt to connect to the server. If successful, it will add the connection to your device list and you may sync your data to the WebDAV server. You will then need to manually configure syncing in iBank Mobile as well.
View, edit, and remove synced devices
To view the device list, choose File > Set Up Device for Syncing or select "Sync Settings" in the "Manage" section of the source list, then click the "Devices" tab. If you have already configured at least one iPhone or iPod touch, the device will appear in the list:

This list shows all the sync connections you have configured. Each item shows an icon for the app it is synced to (iBank Mobile or iBank for iPad), the name of the sync connection, the method chosen for syncing, the date and time of the last sync, and the URL for the WebDAV server (if applicable). To edit the connection settings, click the "Edit" button. To remove a sync connection from the list, select it and click "Delete Device" at the bottom of the list.
Sync your data
If you chose the Bonjour Wi-Fi method of syncing, simply connect your device to the same wireless network as your Mac, make sure iBank 5 is running on your Mac, and tap the sync button in iBank mobile. You cannot initiate a Bonjour Wi-Fi sync from the Mac. To sync your data via WebDAV, click the "Update" button  on the toolbar in iBank for Mac, or choose File > Update Everything. While iBank is uploading your data to the WebDAV server, you will see a progress bar in the status display in the middle of the toolbar. Once the sync is complete on the Mac, tap the sync button in iBank Mobile to retrieve the latest data from the WebDAV server.
Resolve sync conflicts
If a transaction was modified in iBank for Mac and iBank Mobile, and the changes are not consistent when you attempt to sync your data, iBank for Mac will alert you about the conflict:

The two versions of the transaction are shown side-by-side so that you can compare them. A yellow warning badge ![]() appears next to the details that are inconsistent between the two transactions. Choose the version you wish to keep by clicking on it, then click "Continue" to proceed with the sync. If you anticipate multiple conflicts and wish to resolve all conflicts automatically using the "local" (iBank for Mac) version or the "remote" (iBank Mobile) version, click the appropriate transaction and check "Resolve all conflicts with local/remote data" before clicking "Continue."
appears next to the details that are inconsistent between the two transactions. Choose the version you wish to keep by clicking on it, then click "Continue" to proceed with the sync. If you anticipate multiple conflicts and wish to resolve all conflicts automatically using the "local" (iBank for Mac) version or the "remote" (iBank Mobile) version, click the appropriate transaction and check "Resolve all conflicts with local/remote data" before clicking "Continue."
Sync multiple devices
To sync more than one iPhone or iPod touch with iBank for Mac, configure each device using the same steps outlined above. All configured devices will appear in the device list.
When syncing via WebDAV, each device must be configured to use a unique directory. You can name this directory whatever you wish - for example, one device may be configured to sync to the URL, "https://www.myserver.com/ibank_data_1/," while another may use the URL, "https://www.myserver.com/ibank_data_2/." Data does not sync directly between devices, but must be synced through iBank for Mac before it can be synced to other devices.
Reset sync data
If you want to remove all the data on your iPhone or iPod touch and replace it with the data in iBank for Mac, open the device list and click "Edit" next to the device you want to reset. In the sheet that appears, check "Reset all data on next sync" and click "Done." The next time you sync your devices, all iBank Mobile data on that iPhone/iPod will be replaced with the data from your Mac. It is not possible to replace the data on the Mac with data from the device.