How do I create documents in iBank?
To get started using iBank, the first thing you will need to do is create a document. Choose File > New iBank Document to start the new document assistant:

This assistant opens automatically the first time you launch iBank 5, as well as any time you create a new document. Choose one of the following options to determine how iBank should set up the new file:
Start Fresh
Choose this option and click "Next" to create a new iBank document. The next screen will ask you to choose a location in which to save your document: click "Continue," enter a name for the document in the sheet that appears, choose a location, and click "Save."
On the next screen, you will be asked to choose which categories you would like iBank to add to your document. iBank includes two predefined sets of categories: "Home" is intended for personal use, "Business" for professional use. Both sets include categories that are assigned standard US tax codes. Click whichever option you prefer. Next, iBank will prompt you to add accounts to the document: please see About Accounts for more information.
Open Cloud Sync Document
If you previously uploaded an iBank document to the Cloud Sync server and want to connect to it, click this option. You will be prompted to log in with your iBank ID, then the next screen will ask you to choose the cloud document you wish to open:
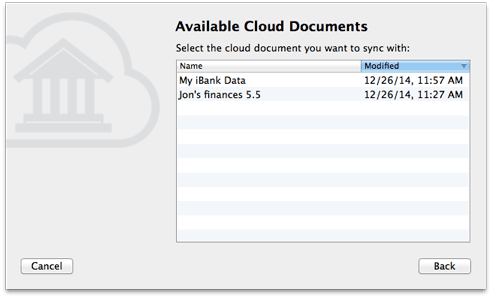
Click a document in the list, and you will be prompted to enter the password required to access it. Enter the correct password and click "Continue." iBank will then begin downloading your data from the Cloud Sync server.
Once the download process has finished, click "Continue" to proceed. The next screen will ask you to choose a location in which to save your document: click "Continue," enter a name for the document in the sheet that appears, choose a location, and click "Save."
Finally, iBank will present you with a "Congratulations" screen to inform you that your new document is ready to use. Click "Done" to continue to the main window.
Import
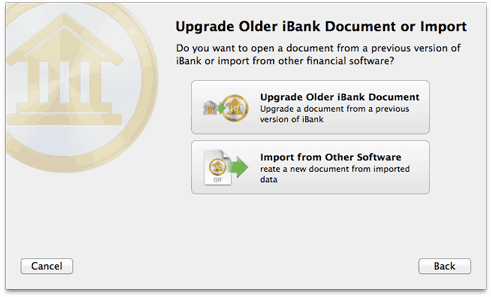
To upgrade from a previous version of iBank, or to import data from another financial management program, click this option. The next screen will ask which software you want to import from:
Upgrade Older iBank Document
If you previously used iBank 3 or 4, and want to upgrade your data for use with iBank 5, click this option. The next screen will ask you to choose the file you wish to open:
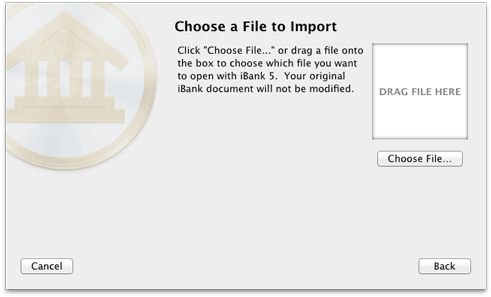
Click "Choose File" to select an iBank document, or drag and drop the document onto the box above that button. On the next screen, iBank will ask you to choose a location for the new document. Click "Continue," enter a name for the document in the sheet that appears, choose a location, and click "Save." iBank will show you some information about new features in version 5, then upgrade your document and save it in the location you specified. Your original document will not be modified, in case you ever want to open it using an old version of iBank.
Once the upgrade process has finished, iBank will present you with a "Congratulations" screen to inform you that your new document is ready to use. Click "Done" to continue to the main window. If any changes were made to your data during the upgrade process, a window will appear to show you the details. See Upgrade Messages for more information about this window.
Import from Other Software
Choose this option to convert your data from another financial management program. On the next screen, choose the option that corresponds to the software you used previously and click "Continue." On the next screen, iBank will ask you to choose a location in which to save your document: click "Next," enter a name for the document in the sheet that appears, choose a location, and click "Save." The next screen provides directions for transferring your data based on the program you are importing from:
Quicken 2015:
- Launch Quicken.
- Review your category names. If any names are longer than 55 characters, please abbreviate them (they can be restored in iBank after the import is complete). Please note that subcategory names, when exported, will include the names of their parent categories in the following manner: Category:Subcategory1:Subcategory2. This entire set of names must be 55 characters or less (including the colons) in order to avoid being truncated during the export process.
- Choose File > Export > Quicken 2007 Transfer File and save the QMTF file on your Desktop.
- Drag and drop the QMTF file from your Desktop onto the box in the iBank window marked "DRAG FILE HERE," or click "Choose File" and select the QMTF file.
You may notice that some of your account names are truncated. Quicken limits account names to 31 characters when it exports them, but you can rename the accounts during the iBank import process.
Quicken Essentials:
- Launch Quicken Essentials.
- Review your category names. If any names are longer than 55 characters, please abbreviate them (they can be restored in iBank after the import is complete). Please note that subcategory names, when exported, will include the names of their parent categories in the following manner: Category:Subcategory1:Subcategory2. This entire set of names must be 55 characters or less (including the colons) in order to avoid being truncated during the export process.
- Choose File > Export > Quicken 2007 and save the QMTF file on your Desktop.
- Drag and drop the QMTF file from your Desktop onto the box in the iBank window marked "DRAG FILE HERE," or click "Choose File" and select the QMTF file.
You may notice that some of your account names are truncated. Quicken Essentials limits account names to 31 characters when it exports them, but you can rename the accounts during the iBank import process.
Quicken for Mac 2007 or earlier:
- Launch Quicken.
- Choose File > Export > To QIF and save the QIF file on your Desktop.
- Drag and drop the QIF file from your Desktop onto the box in the iBank window marked "DRAG FILE HERE," or click "Choose File" and select the QIF file.
Quicken for Windows:
- On your PC, launch Quicken.
- Open any closed accounts.
- Export your data to a QIF file. Since the export command may vary between different versions of Quicken, consult the documentation for help with locating and using this command. All of your Quicken data should be saved to a single file if possible, but the importer will accept multiple files if necessary. If you have a choice of "Strict" vs. "Loose" QIF formats, use "Loose." Do not choose any options labeled "for Mac."
- Copy the QIF file or files to your Mac's Desktop using a flash drive, network transfer, email attachment, or other means of PC-to-Mac file transfer.
- Drag and drop the QIF file or files from your Desktop onto the box in the iBank window marked "DRAG FILE HERE," or click "Choose File" and select them.
Microsoft Money:
- On your PC, launch Money.
- Open any closed accounts.
- Export each account to a QIF file. Since the export command may vary between different versions of Money, consult the documentation for help with locating and using this command. If you have a choice of "loose" or "strict" formats, choose "loose." Make sure to name each QIF file after the account it came from - if the account names do not match exactly, errors may result in the imported data (particularly with transfers between accounts).
- Copy the QIF files to your Mac's Desktop using a flash drive, network transfer, email attachment, or other means of PC-to-Mac file transfer.
- Drag and drop the QIF files from your Desktop onto the box in the iBank window marked "DRAG FILE HERE," or click "Choose File" and select them.
Other software:
- Launch your other financial program.
- Open any closed or hidden accounts (if your software lets you close or hide accounts).
- Export your data to a QIF file. Since the export command may vary from one financial manager to the next, consult the documentation for help with locating and using this command. All of your financial data should be saved to a single file if possible, but the importer will accept multiple files if necessary.
- If your financial program does not run on a Mac, copy the QIF file or files to your Mac's Desktop using a flash drive, network transfer, email attachment, or other means of PC-to-Mac file transfer.
- Drag and drop the QIF file or files from your Desktop onto the box in the iBank window marked "DRAG FILE HERE," or click "Choose File" and select them.
Complete the import
Once you have chosen the import file or files, iBank will show some information about importing. iBank can import accounts, transactions, categories, investments, and security prices from QIF files, as long as that data is present. Other data such as classes, scheduled transactions, memorized transactions, budgets, and reports cannot be imported. Click "Start Import" to display a list of all the accounts available for importing:
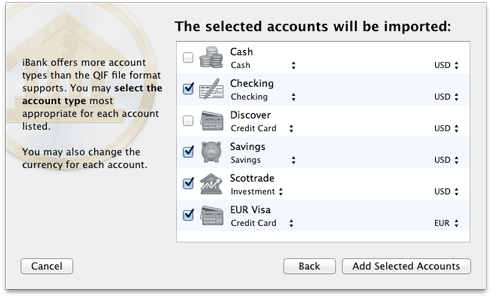
Check off the accounts you wish to use in iBank. You can rename an account by clicking on its name, change the account type by clicking on the default type and choosing an alternative from the drop-down menu, or change the currency by clicking it and choosing another. Once you have all the accounts set up the way you want them, click "Add Selected Accounts." If iBank cannot recognize the dates in the file, you will be asked to choose a date format before proceeding.
When importing multiple QIF files, iBank will process one file at a time. You will be asked to configure accounts for each file in succession, rather than selecting them all in the same window.
iBank will automatically create a set of basic reports to help you analyze your data. Once the import process has finished, iBank will present you with a "Congratulations" screen to inform you that your new document is ready to use. Click "Done" to continue to the main window.