How do I attach files to my transactions?
iBank allows you to attach a file to each transaction and (optionally) display custom images in the account register. You might take a picture of your brand new iPad for posterity, attach a receipt for the books you ordered from Amazon.com, or file a digital copy of Form 1040 with your federal income tax payment. Files of any type may be attached.
The left side of each transaction in the account register is used to show images and attachments. By default, this space shows the image associated with whatever category is assigned to the transaction. If no category is present, or if the category has no image, the space will show a picture of a bank façade:
![]()
Attach a file
Select a transaction to bring up the transaction editor, then drag and drop a file onto the box surrounded by a dotted line on the left side of the editor. A copy of the file will be stored inside your iBank document, so you can delete the original if you want to. When a file has been attached to a transaction, iBank will show a document icon in the account register:

To view the file and access other attachment options, double-click the box on the left side of the transaction editor. The popup file inspector will appear:
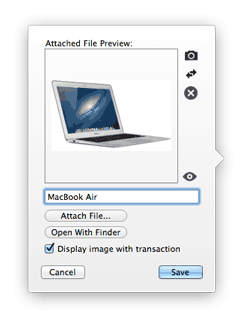
To change the file attached to the transaction, drag and drop a file into the large box or click "Attach File" and choose the file you want. A preview of the file will appear in the box, and the name of the file will appear below it. If you want to show a picture of the attachment in the account register, check the "Display image with transaction" option. iBank will replace the transaction's category image with the file preview.
If you don't want to see any images in the transaction register, choose iBank > Preferences, click the "Appearance" button, and check "Hide category and transaction images." A small pushpin will be shown in the transaction editor in place of the image; double-click the pushpin to use the attachment feature.
Take a picture with your Mac's camera
If your Mac has a built-in camera, click the small camera button in the file inspector, then click the "Camera" tab to show the snapshot window. Here you can take a picture and attach it to the transaction:
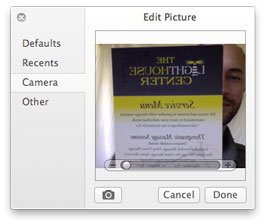
Click the camera button at the bottom of the snapshot window to take a picture, then use the slider to zoom the image to an appropriate size. Click "Recents" to select a snapshot you took previously, or click the "Other" button to open another image file. Once you have the image prepared the way you want it, click the "Done" button to attach it to the transaction.
Reverse an image
Click the double-arrow button in the file inspector to flip the image horizontally (as if it were being viewed in a mirror). This can come in handy when you take a snapshot of a receipt, for instance, and want to be able to read it properly.
View an attachment
If you want to view an attached image at full size, print an attached document, save a copy of a file, etc., open the popup file inspector and click the "Open With Finder" button. iBank will open the attached file using the default application for its file type. The "Print" and "Save As" commands in that application can be used to print and save a copy of the file, respectively.
Remove an attachment
Open the popup file inspector and click the 'X' button to the right of the file preview. The file will be removed from the inspector and from the iBank document.