How do I pay bills online using iBank?
iBank 5 supports online bill pay, which allows you to send payments electronically using bank accounts that support direct download. Also known as OFX or "Direct Connect," iBank's direct download feature provides one-click transaction updates in addition to bill pay. IGG Software does not charge for direct downloads or bill pay, but many institutions require a separate enrollment and charge a monthly fee for these services.
Online bill pay is only available to customers in the United States, and an internet connection is required to send payments. Make sure you are connected before attempting to set up an account for use with online bill pay.
Sign up with your financial institution
Unless you are already familiar with your bank's policy regarding bill pay, the first step is to contact your financial institution and inquire about this service. When speaking to your bank representative, use the words "OFX Bill Pay" for clarity. If the representative says that iBank is not supported, ask if Quicken for Windows is supported. As long as one of the two programs is, iBank will be able to download your account data and submit bill payments.
If bill pay is available, be sure to ask if there is a signup progress involved, and whether or not there are fees for using the service. Even if you already signed up for direct download, you may need to enroll in bill pay separately, and some institutions charge an additional fee for this. Finally, ask what credentials you should enter in iBank to log in for direct download (you can skip this step if direct download was already configured). Some banks use your website login details; others will issue separate credentials.
Set up an account with direct download
Once you have signed up, paid any requisite fees, and obtained your login details, you are ready to configure your iBank accounts for direct download (bill pay will follow once downloads are enabled). For information about setting up direct download for a new or existing account, see Direct Download. Provided your bank has granted you access to bill pay, you are now ready to use this feature in iBank.
Send a payment for a new bill
Click the "Pay Online" button  on the toolbar, or choose Tools > Send Online Payment. The bill pay assistant will appear to walk you through the process of sending an online payment:
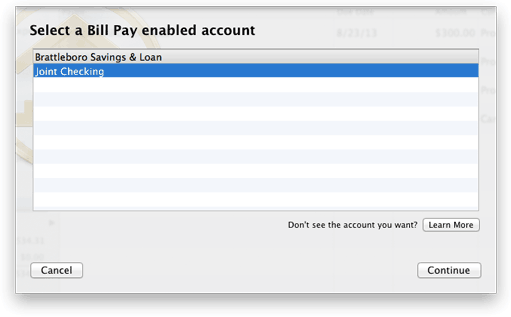
Select which account should be used to send the payment and click "Continue" to proceed. The next screen will prompt you to enter payment details:
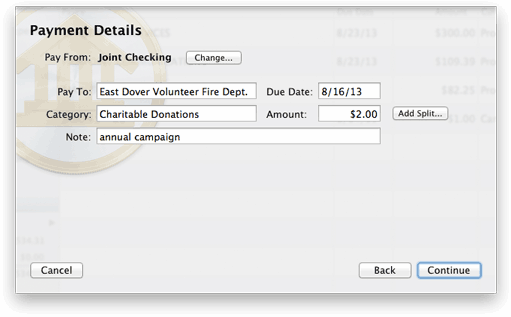
Start typing the name of the person or company you want to pay. iBank will automatically suggest names based on your transaction templates. As you are typing, a drop-down list will appear showing the payees that match what you are typing. Use the mouse to click one of the names, or use the arrow keys to select one and then press the Tab or Return key. iBank will fill in several of the payment details (category/splits, amount, and note) based on the template associated with that payee (these fields will be shaded yellow as a result). If you don't want to accept a suggestion, simply ignore it and continue typing. You can view a list of all known payees by pressing the down arrow key before you begin typing a name.
Next, enter a due date for the payment. By default, iBank shows the earliest date for which your bank can guarantee delivery. As long as you enter a date that is no earlier than the default, iBank will ensure that the payment is received on or before the date you enter. Enter a category for the transaction or click the "Add Split" button to split the transaction and assign multiple categories. Enter the payment amount and any notes you want to be submitted with the payment, then click "Continue" to proceed.
Each bank handles online payments differently. Some banks wait until the payment's due date before withdrawing funds, some process the payment on the same date you submit it, and some choose a date in between. Contact your bank to learn more about how it handles online bill payments.
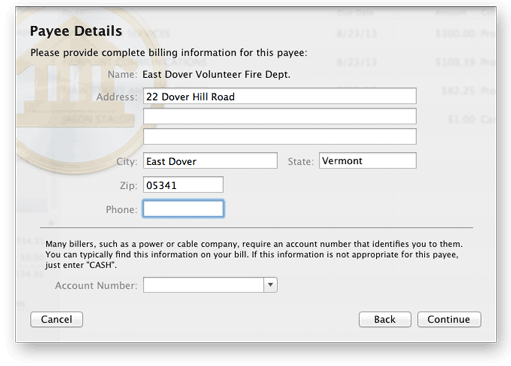
If this is the first time you are sending a payment to the payee you entered, iBank will show you this screen to gather details for the payee. Fill in the payee's address (U.S. addresses only) and phone number. If you are sending payment to a business that requires you to identify yourself using an account number (this is common for utility companies in particular), enter it in the space provided. Account numbers can typically be found on bills and invoices. If no account number is required, enter "CASH" instead. Click "Continue" to proceed. The next time you submit a payment for the same payee, iBank will load the payee details automatically.
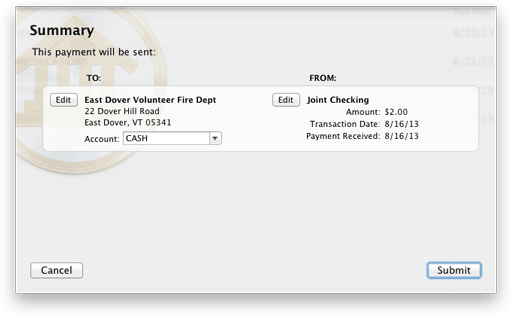
Next, iBank will show you a preview of the payment. Take a moment to review the details and make sure they are correct. You can type in a different account number if necessary, or click the "Edit" button to make other changes. Once you have the payment configured properly, click "Submit" to connect to your bank and submit the payment.
iBank will check to make sure the payment will not overdraft your account (according to its records) and alert you if an overdraft seems likely. You may choose to cancel the payment or ignore the warning and submit the payment. You might continue if you know that your iBank account balance is out-of-date or if you expect to receive income before the payment finishes processing.
Finally, iBank will prompt you to enter your login details for your financial institution. You must log in each time you submit a payment, for security. Enter the username and password that your bank gave you for direct download and bill pay. Once you log in successfully, iBank will submit the payment and show you the result. If there is a problem, iBank will give you the option to correct it and try again. If the payment is accepted, iBank will tell you and let you choose whether to make another payment or simply close the assistant.
Send payments for upcoming scheduled transactions
Click the "Post" button  on the toolbar or choose Tools > Confirm Scheduled Transactions to view your upcoming scheduled transactions. For any transactions you want to pay online, make sure they are scheduled to post to accounts that have bill pay enabled, then edit their details to make sure the due dates, payees, categories/splits, amounts, and notes are correct. Select a transaction or Command-click to select more than one, then click the "Pay Online" button to open the bill pay assistant:
If any of the payments have payees that you haven't sent payments to before, iBank will show you this screen to gather details for each payee. Fill in the payee's address (U.S. addresses only) and phone number. If you are sending payment to a business that requires you to identify yourself using an account number (this is common for utility companies in particular), enter it in the space provided. Account numbers can typically be found on bills and invoices. If no account number is required, enter "CASH" instead. Click "Continue" to proceed. The next time you submit a payment for the same payee, iBank will load the payee details automatically.
Next, iBank will show you a preview of the payments belonging to one of your bill pay accounts. Take a moment to review their details and make sure everything is entered correctly. You can type in different account numbers if necessary, or click the "Edit" button to make other changes. Once you have the payments configured properly, click "Submit" to connect to your bank and submit the payments.
iBank will check to make sure the payments will not overdraft your account (according to its records) and alert you if an overdraft seems likely. You may choose to cancel the payment or ignore the warning and submit the payment. You might continue if you know that your iBank account balance is out-of-date or if you expect to receive income before the payment finishes processing.
Finally, iBank will prompt you to enter your login details for your financial institution. You must log in each time you submit a payment, for security. Enter the username and password that your bank gave you for direct download and bill pay. Once you log in successfully, iBank will submit the payments and show you the result. If there is a problem, iBank will give you the option to correct it and try again. If the payments are accepted, iBank will tell you and then proceed to payments for the next account. Once all payments have been submitted, the assistant will close.
Check the status of a payment
Once a payment has been accepted by your bank, iBank will record a transaction in the relevant account with its date set to the expected date of payment (as determined by the bank) and its status set to "Uncleared." To check the status of your payment, select "Payments" in the "Manage" section of the source list. If you don't see anything in that section, mouse over the "Manage" heading, click "Show," then select "Payments." A list of payments that you sent using online bill pay will appear to the right:
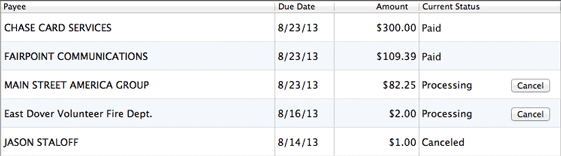
Each payment shows its payee, due date, amount, and current status. You may see any of the following statuses:
- Processing: The payment was scheduled but has not yet been delivered.
- Paid: The payment was delivered successfully.
- Insufficient Funds: The payment was canceled because there was not enough money available in your account.
- Failed: The payment was canceled for another reason, for example an incorrect delivery address. Contact your bank to inquire about the specific reason for the payment's failure.
- Canceled: The payment was canceled at your request.
To refresh the status of your payments, click the "Update" button  on the toolbar, or choose File > Update Everything. iBank will connect to your bank online and get the current status for each of your payments. If the status of a payment changes from "Processing" to "Paid," iBank will automatically mark the corresponding transaction in your account "Cleared." If the status changes to "Insufficient Funds" or "Failed," the transaction in your account will be deleted.
Once a payment has finished processing, whether it was successful or not, it is up to your bank to determine how long the payment remains available in the list. Some banks may only show completed payments for a day or two; others may leave them in the list indefinitely.
iBank does not support recurring payments. If you scheduled a recurring payment through some other means, such as another financial manager, that payment will not be accessible in iBank.
Cancel a payment
While a payment is still processing, iBank will show a "Cancel" button next to its status in the list. Click this button to send a cancellation request to your bank. If the bank is able to cancel the payment, iBank will change the payment status to "Canceled" and delete the corresponding transaction in your account.
Disable bill pay
To turn off bill pay features for an account, you will need to disable direct download. Click the cloud icon next to the account name in the source list, or select the account and choose Account > Show Online Access Info. Click the "Remove OFX Connection Settings" button to disable direct download and bill pay for that account. The payments listed under "Payments" in the source list will be removed, but the transactions already recorded to your account will remain in place. Any payments that are being processed by your bank will continue being processed, but you will not be able to check their status in iBank. If you later reestablish a direct download connection, iBank will display the payments associated with your account.
If you delete an account that was used for online bill pay, all payments associated with that account will be removed from the "Payments" list. Any payments that are still being processed by your bank will continue being processed, but you will not be able to check their status in iBank.