How do I schedule recurring transactions?
 Scheduled transactions can be created to track financial activities that occur on a repeating basis, for example a monthly mortgage payment or biweekly paycheck. Scheduled transactions are based on transaction templates. When one or more schedules are associated with a template, transactions based on that template will be created in your accounts as the schedules dictate. For more information about templates, see Transaction Templates.
Create a scheduled transaction
There are several different ways to create a scheduled transaction. Use any of the following methods:
- Select "Scheduled Transactions" in the "Manage" section of the source list (if you don't see anything in this section, hover over the "Manage" heading and click "Show" to the right) and click the plus (+) button at the top of the template list. A new template will be added, and an inspector will pop up automatically to let you edit the template's schedule.
- Select one or more transactions in any account register and choose Transaction > Make Scheduled Transactions from Selection. New transaction templates will be created with the details of the selected transactions, and each one will be assigned a monthly schedule. To edit the schedule for one of the new templates, select "Scheduled Transactions" in the source list, select a template, and click the button where the transaction date is shown.
- Drag and drop a transaction from any account register onto the "Scheduled Transactions" item in the source list. A new transaction template will be created with details of the transaction and a monthly schedule. To edit the schedule, select "Scheduled Transactions" in the source list, select the new template, and click the button where the transaction date is shown.
- Select "Scheduled Transactions" in the source list and click "All Templates" at the top of the template list. Select any template that you want to use as a scheduled transaction, then click the "Schedule" button in the transaction editor to add a schedule to the template. After you save the schedule, the template will appear under the "Scheduled" tab with the other scheduled transactions.
Edit a template's schedules
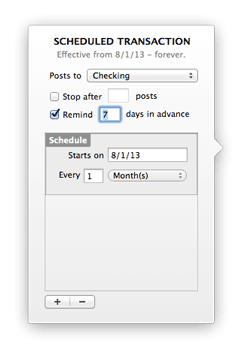
Each transaction template can be assigned one or more schedules to determine when transactions based on that template will be posted to your accounts. To configure the schedules associated with a template, select "Scheduled Transactions" in the source list, select the template you want to edit, and click the button where the transaction date is shown. The schedule inspector will appear:

A few basic settings affect all schedules assigned to the template:
- Posts to: Choose which account the transaction will be recorded in.
- Stop after: Check this box and enter a number to have only a fixed number of transactions posted to the account; the schedules will be deleted after the last transaction has been posted. Uncheck the box to have the schedule continue posting transactions until it is modified or deleted.
-
Remind: Check this box if you want iBank to notify you before a schedule is due, so that you can edit the transaction details and choose whether or not to post the transaction at that time. Enter the number of days prior to the due date you want iBank to notify you about the upcoming payment. iBank will remind you about the upcoming transaction when you open your document (see below) and it will also add a reminder to the Apple Reminders app under a group named "iBank."
To keep alerts from the Reminders app in Notification Center until you respond to them, open System Preferences, click the "Notifications" button, select "Reminders," and set the alert style to "Banners." To show reminders in iBank but not in the Reminders app, select "Scheduled Transactions" in iBank's source list and uncheck "Add to Reminders app" at the top right corner of the window.
If you don't want to be reminded before a scheduled transaction is due, uncheck the "Remind" box. The scheduled transaction will still be available for use with budgets (see below), but iBank will not post the transaction to an account when its due date arrives.
Click the plus (+) button at the bottom of the inspector to add a new schedule. Each schedule is represented by a set of options enclosed in a box with the "Schedule" label. To delete a schedule, click the box surrounding one of the schedules (so that it turns blue), then click the minus (-) button to remove it. Each schedule has the following options that you can configure:
- Starts on: Enter the date on which the schedule should begin posting transactions to the account.
- Every: Enter a number and choose a period of time to indicate how often the transaction will be posted.
When you are done configuring schedules for the template, click "Save" to record your changes, or click "Cancel" to discard them. You may edit the other template details (payee, amount, etc.) just like you would edit a transaction in an account register.
Multiple schedules come in handy when you want to post transactions at irregular intervals. For example, to post a transaction on a semi-monthly basis, you could configure one monthly schedule for the 1st of the month and a second monthly schedule for the 15th.
Delete a scheduled transaction
Select "Scheduled Transactions" in the source list, select a template, and click the minus (-) button at the top of the template list. The entire template will be deleted: it will no longer appear in "Transaction Templates," "Scheduled Transactions," or "Import Rules," and all schedules and import rules associated with the template will be deleted along with it. Any transactions that were already posted to your accounts are not affected by deleting the template.
Process upcoming scheduled transactions
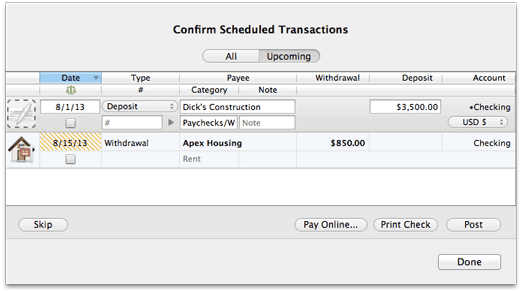
Make sure you have at least one scheduled transaction configured to use reminders (see above), then click the "Post" button  on the toolbar or choose Tools > Confirm Scheduled Transactions. Alternatively, you can simply wait until the reminder date for one or more of your transactions arrives. When you open your iBank document on that date, a window will appear automatically with the transactions that are ready to post to your accounts:

The "Upcoming" tab shows transactions that are due soon, based on the number of days you chose to be reminded within (the default is 7). These transactions show their dates with orange stripes as long as they remain in the future. Once the due date for a transaction has passed, it will show a "Late" badge to highlight its urgent need for attention. The "All" tab shows the next due date for all scheduled transactions that are set to use reminders, regardless of when they are due. Select a transaction in the list and choose what action to take with it:
- Skip the transaction: Click "Skip" to remove the transaction from the list without recording it in an account. Its schedule will advance and you won't see the transaction until the next time it comes due.
- Submit an online payment: Click "Pay Online" to send an electronic payment for the selected transaction. Feel free to edit the transaction before sending a payment, if necessary. To use this feature, you must have at least one account configured to use bill pay. For more information, see Online Bill Pay.
- Print a check: Click "Print Check" to print the details of the selected transaction on check stock. Feel free to edit the transaction before printing it, if necessary. For more information, see Check Printing.
- Post the transaction: Click "Post" to remove the transaction from the list and record it in the account shown in the "Account" column. Feel free to edit the transaction before posting it, if necessary. Any changes you make to the transaction in this window will only apply to this instance of the transaction, and will not affect later transactions posted by the same schedule. To modify all upcoming instances of a transaction, you will need to edit the template in the main "Scheduled Transactions" list.
When you are finished processing your scheduled transactions, click "Done" to return to the main window.
Review upcoming transactions at a glance

The summary pane at the bottom left corner of the main window shows the next three upcoming scheduled transactions. If you don't see the summary pane, click the toggle button  to show it, and/or click the arrow at the top right corner of the pane to switch from the net worth mini-graph to the summary figures. Click the arrow next to any scheduled transaction to view and edit it in the main "Scheduled Transactions" list.
Use scheduled transactions for budgeting
In iBank 5, scheduled transactions are tightly integrated with budgets. When you set up a new budget, iBank automatically uses your scheduled transactions to determine how much money you expect to earn and spend. Be sure to categorize each of your scheduled transactions so that you can compare expected and actual amounts on the budget report. As you monitor your budget throughout the month, you can make changes to your scheduled transactions, and iBank will keep track of the changes you make.
To illustrate, let's say you set up a budget with a scheduled transaction for a monthly salary of $2500. In January and February, you were paid $2500, which is exactly what you expected: your budget is accurate for those months. In March, however, you get a raise and are now getting paid $2800 each month (lucky you)! If you edit the scheduled transaction in March to make its amount $2800, your budget will automatically adjust to show $2800 as the expected amount for March, April, May, and so forth. If you go back in time and view your budget for January, however, iBank will still show that both your expected and actual salary for that month was $2500.
When you edit a scheduled transaction under "Scheduled Transactions" in the source list, the changes are always applied to the current month. If you want to change the expected amount for a scheduled budget item at some date in the past, you will need to make that change in a budget report that shows the time period when you want the change to take effect.
Under the hood, each change you make is tracked according to its "effective date." This date is shown at the top of the schedule inspector. Note that because of this feature, new scheduled transactions cannot be used to record repeating transactions that occurred prior to the current month. The schedule's starting date may be set earlier, but iBank will not show reminders or post transactions for dates prior to the effective date.