How do I update my accounts using direct download?
Also known as OFX or "Direct Connect," iBank's direct download feature provides one-click transaction updates and support for online bill pay. IGG Software does not charge for direct download or bill pay, but many institutions require a separate enrollment and charge a monthly fee for these services. Fewer institutions support this download method than Direct Access.
An internet connection is required to use direct download and bill pay. If you are not connected to the internet, feel free to set up your accounts manually. You can always configure online access for them at a later date.
Sign up with your financial institution
Unless you are already familiar with your bank's policy regarding direct downloads, the first step is to contact your financial institution and inquire about this service. When speaking to your bank representative, use the words "OFX Direct Connect" for clarity. If the representative says that iBank is not supported, ask if Quicken for Windows is supported. As long as one of the two programs is, iBank will be able to connect and download your account data.
If direct download is available, be sure to ask if there is a signup progress involved, and whether or not there are fees for using the service. If you are interested in using online bill pay, inquire about this as well - some institutions charge an additional fee for it. Finally, ask what credentials you should enter in iBank to log in. Some banks use your website login details; others will issue separate credentials for direct download.
Once you have signed up, paid any requisite fees, and obtained your login details, you are ready to configure your iBank accounts for direct download and bill pay.
Begin direct download setup
Setting up a new account with direct download:
Click the plus (+) button on the left side of the toolbar and choose "Add Account," or choose Account > New Account. The new account assistant will open to help you create an account:
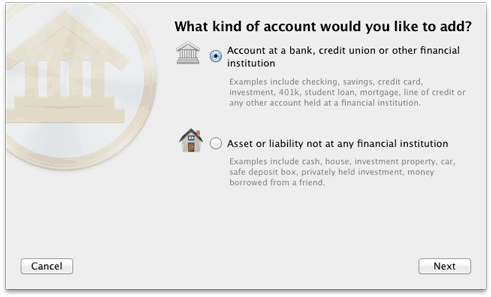
On this screen, you are asked to choose whether or not the account you are setting up is held at a financial institution. To use direct download, select the first option and click "Next" to proceed.
Adding direct download to an existing account:
If your account is already set up in iBank, and you simply want to enable direct download for it, select the account in the source list and choose Account > Set Up Online Access. If the screen that appears says "Online Access Information," then the account is already set up for either Direct Access or direct download. Otherwise, you should see the title, "Enable Downloading of Transactions." Read over the information on this screen and click "Find Your Bank" to proceed.
Choose a financial institution
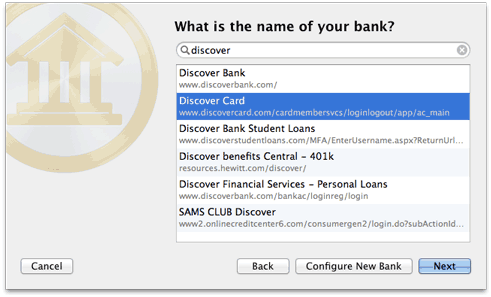
On this screen, choose the financial institution that holds the account. Begin typing the name of the institution in the search box to narrow down the choices, then select the appropriate name from the list and click "Next" to proceed. If your institution is not listed, it does not currently support direct download: click "Configure New Bank," enter the bank name and website address, then click "Next" to proceed with web download or manual setup.
Choose a connection type
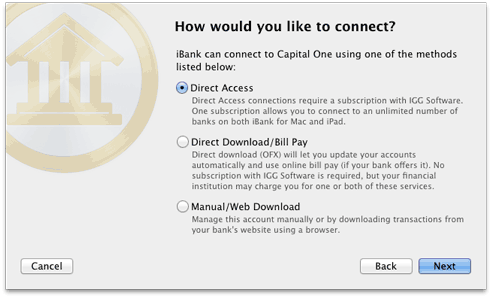
Once you choose an institution, iBank will ask the servers at IGG Software what types of connections are currently available for your selection. If "Direct Download/Bill Pay" is listed, select it and click "Next" to continue. If you do not see this as one of the available choices, then your financial institution is not currently supported and you will need to proceed with one of the other options.
Log in to your institution
Next, iBank will prompt you to enter the login details for your financial institution:
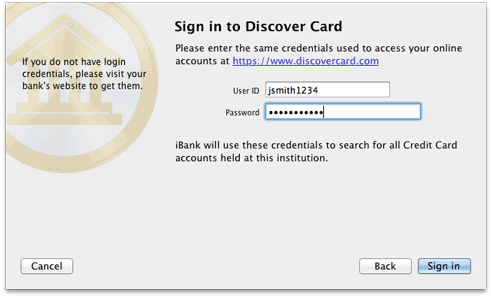
Type in the login credentials that you obtained from your bank (which may or may not be the same as what you use to log in to the bank's website), then click "Sign In" to proceed. Some institutions will ask you to specify the account type first, or require an additional mode of authentication (such as MFA). You may also be asked to change your password the first time you log in, if your institution requires it. Once you complete the login process, you will not be asked for your credentials again: the username and password for each account are stored in the Mac OS X Keychain and are used automatically when you update your accounts. For more information, see Security & Privacy.
Select accounts to import
Once you are logged in to your financial institution, iBank will display a list of all the accounts you hold at that institution that support direct download:
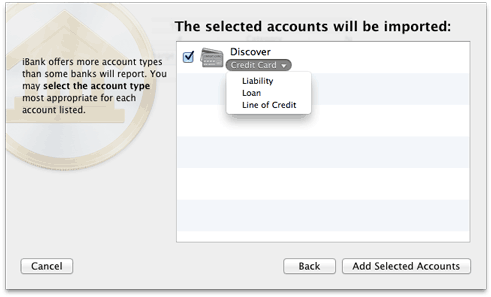
If you are adding new accounts, check off the accounts you wish to use in iBank. A checkbox may be disabled if you are already using that account in your iBank document. You can rename an account by clicking on its name, or change the account type by clicking on the default type and choosing an alternative from the drop-down menu. Once you have all the accounts set up the way you want them, click "Add Selected Accounts."
If you intend to use an account for bill pay, be sure to choose Checking, Savings, or Money Market as the account type, as these are the only types that support bill pay.
If you are configuring direct download for an existing account, simply select the online account you want to associate with your iBank account and click "Add Selected Accounts" to proceed.
Complete account setup
One final screen will notify you that setup is complete. If you just finished adding a new account, iBank will give you the option to set up another.
Fix cost basis (investment accounts only)
If you chose to import one or more investment accounts, iBank downloaded your current holdings and as much of your transaction history as possible. If a complete history was not available, however, the cost basis for the securities in that account is likely to be incorrect. To check if your cost basis is complete, choose Account > Fix Cost Basis. If there are any shares that have gaps in their history, they will appear in a list:
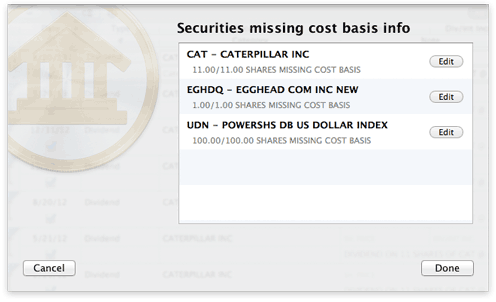
For each security that appears in the list, click the "Edit" button and iBank will prompt you to enter its cost details. You can either average the original purchase price of the missing shares and record them as a single lot, or you can enter multiple lots with different share prices.
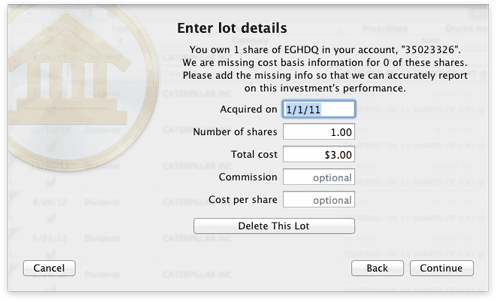
Enter the date on which the shares were purchased, the number of shares bought, and whatever price details you have: the total cost of the purchase, the amount of commission paid, and/or the price paid per share. Click "Continue" to record the lot. If you have not accounted for all the missing shares of the security in question, iBank will prompt you to enter another lot. Once all shares have been accounted for, iBank will show you a list of the lots you recorded:
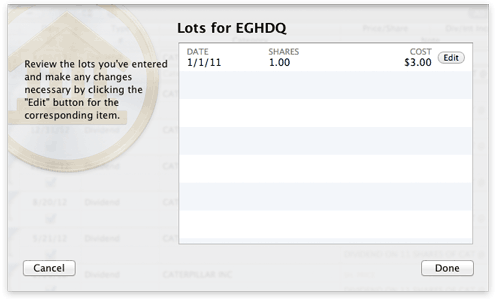
If any changes need to be made, click the "Edit" button next to a lot to adjust or delete it. When all the details are correct, click "Continue" to return to the list of securities with missing cost basis information. Once you have recorded the cost basis for all securities in the list, click "Done" to return to the main window.
It pays to be meticulous when recording your cost basis! Missing or incorrect cost data can cause iBank to miscalculate the value of your investments when you generate reports. Request a copy of your transaction history from your brokerage, if necessary, to ensure that you are recording the correct information in iBank.
Set up online bill pay
Once your account has been set up with direct download, you may also be able to set up online bill pay if your bank offers this feature. For more information, please see Online Bill Pay.
Update account transactions
Whenever you open a document, iBank will automatically update all accounts in the document that are configured with online access. You can update at any time by clicking the "Update" button  on the toolbar. Any new transactions that are available in your direct download accounts will be downloaded and added to those accounts automatically, and a number will appear next to each account in the source list to show you how many transactions were imported. To update an individual account, select it in the source list and choose Account > Download Transactions for Selected Account.
During the update, iBank will automatically screen out any duplicate transactions, mark all transactions "cleared" that were imported or matched by incoming transactions, and apply import rules to clean and categorize the incoming transactions. To review the results of the import, see Using the Resolve View.
If you don't want iBank to update accounts automatically when you open documents, choose iBank > Preferences, click the "General" button, and uncheck "Automatically update documents when opened." To temporarily disable automatic updates for a particular document, hold down the Option key when you open that document.
Merge duplicate transactions
To merge transactions from two different sources (for example, combining a direct download transaction with one that was posted from a scheduled transaction), simply drag and drop one transaction onto the other. The resulting merged transaction will contain the details of the transaction onto which the other was dropped. To view the details of a transaction as they were originally imported, prior to matching, import rule processing, and manual merging, select the transaction and choose Transaction > Show Original Import Info.
Review connection details or disable direct download
Accounts that have online access enabled (whether they are using Direct Access or direct download) are shown in the source list with a picture of a cloud:

Click the cloud (or select the account and choose Account > Show Online Access Info) to review the account's online access information:
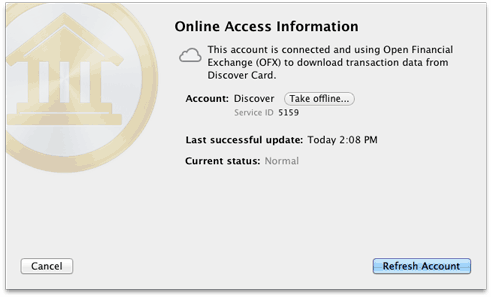
If there is a problem with the online connection, you will see an exclamation point in the cloud, and this screen will show details about the problem and how to resolve it. To refresh the connection to an online account, click "Refresh Account." If the account login details have changed, you will be prompted to enter them again. To turn off direct download for an account, click "Take offline" on this screen. The account will no longer be connected to an online institution and will need to be updated manually from that point forward. If you want to re-enable online access in the future, select the account and choose Account > Set Up Online Access.
Log connection details
If a bank connection does not work as expected and you contact us for assistance, a support representative may ask you for a connection log to assist with troubleshooting. To obtain a connection log, choose iBank > Preferences, click the "Advanced" button, and check the box next to "Log OFX and Direct Access connections." Close the preferences window and try your download again; this time, the details of the connection attempt will be logged to a file on your Mac. In order to protect your privacy, iBank omits account numbers from the connection logs.
To view the log file, once again choose iBank > Preferences and click the "Advanced" button. Click the gear-shaped action button and choose "Reveal in Finder." A window will open with one or two log files; double-click the one named "OFX-activity.txt" to view the details of your recent direct download connections. If a support representative requests a copy of the log via email, simply drag & drop the log file into a new Mail message.
To delete the log files from your Mac, choose iBank > Preferences, click the "Advanced" button, click the gear-shaped action button, and choose "Delete Log Files."