How do I use the built-in web browser to download transactions?
For those financial institutions that don't support Direct Access or direct download, iBank offers a built-in web browser to simplify the process of updating your accounts manually. You can also add a URL to an account that uses another download service to browse its financial institution's website.
An internet connection is required to use web download. If you are not connected to the internet, feel free to set up your accounts manually. You can always configure online access for them at a later date.
Add web download to an existing account
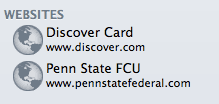
If you previously set up an account manually, and now would like to use iBank's built-in browser to download transactions into the account, all you need to do is add a URL to the account settings. In the source list, double-click the account you want to modify, and the account inspector will pop up next to the account. Enter your financial institution's web address in the "URL" field. Try to be as specific as possible (i.e. enter the address that will take you directly to your account login) so as to avoid unnecessary browsing when it comes time to update your accounts. You may also enter a label for the website in the "Bank" field (if you don't, the account name will be displayed instead). When you are done, click "Save" to close the account inspector. A shortcut to the web page you entered will be added to the "Websites" section of the source list:
Set up a new account for web download
Click the plus (+) button on the left side of the toolbar and choose "Add Account," or choose Account > New Account. The new account assistant will open to help you create an account:
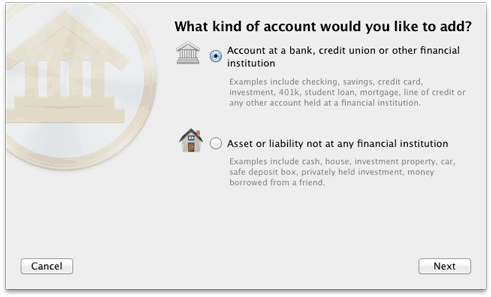
On this screen, you are asked to choose whether or not the account you are setting up is held at a financial institution. To use web download, select the first option and click "Next" to proceed.
Choose a financial institution
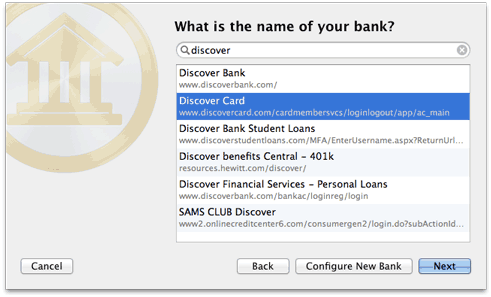
On this screen, choose the financial institution that holds the account. Begin typing the name of the institution in the search box to narrow down the choices, then select the appropriate name from the list. If your institution is not listed, it does not currently support direct download: click "Back" and choose "Asset or liability not at any financial institution" to set up the account manually. Otherwise, click "Next" to proceed.
Choose a connection type
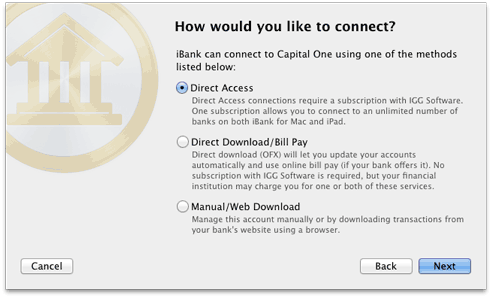
Once you choose an institution, iBank will ask the servers at IGG Software what types of connections are currently available for your selection. Select "Manual/Web Download" and click "Next" to proceed. The next screen will offer you a choice of configuring web download or setting up the account manually. Click "Web Download" to continue.
Download account history
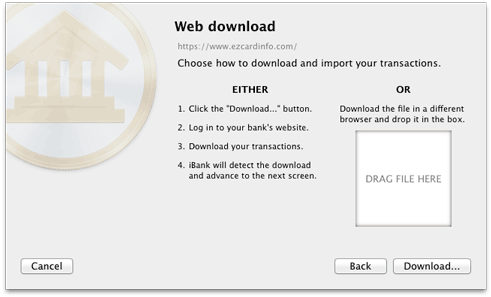
On this screen, You are presented with two options to import your data:
Downloading with iBank's built-in browser:
Click the "Download" button to open your bank's website in a new window. Each financial institution handles the download process a little bit differently (some do not allow you to download transactions from their websites at all). For specific help with downloading transactions from your bank's website, please contact a customer support representative at the institution. In general, however, there are four main steps you must follow:
- Log into your personal account by typing in your user ID and password.
- Browse to the page within your account where you can download transactions.
- Select the account from which to download the transactions, enter a start and end date for the download, and choose a file format.
- Initiate the download.
iBank's built-in browser does not accept popup windows. If your financial institution utilizes popups in order to download data, you will not be able to use iBank's browser. Download the data using another browser, then drag and drop the file into the iBank window where you see "Drag File Here."
Here is a sample download form from one bank's website:
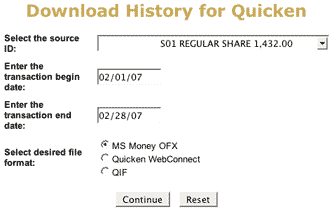
When specifying a start and end date for the download, be sure to choose dates that capture as much data as possible. Ideally, you will want to import your complete transaction history. If the OFX or QFX file format is available, choose one of those options as they contain the most comprehensive transaction data. If neither of those are available, choose QIF or CSV format. Be aware that iBank cannot import investment data from CSV files.
Some banks provide several download options without specifying which file type each one uses. Generally speaking, "Microsoft Money" usually indicates OFX, "Quicken Web Connect" usually indicates QFX, and "Quicken" format usually indicates QIF. You do not actually need to own the software indicated to download a file in a particular format - just use the software name as a guide to determine the file type you need.
Once you have prepared the download settings, click the download button on the web page to continue.
Downloading with another web browser:
If you are unable to use iBank's built-in browser for any reason, launch your favorite web browser (e.g. Safari, Firefox, Chrome), log in to your bank's website, and download your account history to a file (see suggestions above regarding file formats). Once the file download is complete, drag and drop the file from the Finder to the iBank window where you see "Drag File Here."
Select accounts to import
Depending on the file format you downloaded, iBank will handle the next step differently:
OFX/QFX:
If you chose the OFX or QFX format, iBank will display a list of all the accounts in the file. Check off the accounts you wish to use in iBank. You can rename an account by clicking on its name, or change the account type by clicking on the default type and choosing an alternative from the drop-down menu. Once you have all the accounts set up the way you want them, click "Add Selected Accounts."
QIF:
If you chose the QIF format, iBank will display a list of all the accounts in the file. Check off the accounts you wish to use in iBank. You can rename an account by clicking on its name, change the account type by clicking on the default type and choosing an alternative from the drop-down menu, or change the currency by clicking it and choosing another. Once you have all the accounts set up the way you want them, click "Add Selected Accounts." If iBank cannot recognize the dates in the file, you will be asked to choose a date format before proceeding.
CSV:
If you chose the CSV format, you will be asked to assign labels to the data columns (see File Import for more information). If iBank cannot recognize the dates in the file, you will be asked to choose a date format. Finally, you will be prompted to choose a name, type, and currency for the account.
Complete account setup
One final screen will notify you that setup is complete and give you the option to add another account. In addition to seeing your new account(s) in the source list, you will also see one or more website shortcuts under the "Websites" section:
Browse your bank's website
In the source list, click the shortcut to the website you want to browse. Assuming you have an active connection to the Internet, iBank will load the web page to the right, where you normally see the account register:
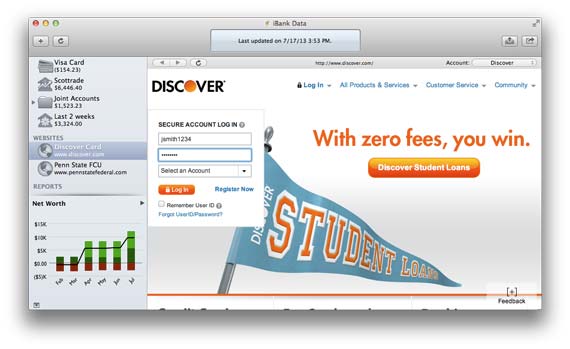
Use iBank's built-in browser just like you would any other web browser (e.g. Safari, Firefox, Chrome): click a link to browse to that page, and use the buttons along the top of the window to navigate. Click  to go back,
  to go forward, and
  to refresh the current page. A progress indicator
  shows when a page is loading, and the address of the current page is displayed at the top of the window.
Some financial institutions only allow certain browsers to access their websites. If you cannot load your institution's site using iBank's browser, choose iBank > Preferences, click the "Advanced" button, and choose "Safari" from the popup button. Close the preferences window and try refreshing the website. If your institution allows access for Safari, iBank should now be able to load the page.
Update your accounts with web download
Each financial institution handles the download process a little bit differently (some do not allow you to download transactions from their websites at all). For specific help with downloading transactions from your institution's website, please contact a customer support representative at the institution. In general, however, there are five main steps you must follow:
- Log into your personal account by typing in your user ID and password.
- Browse to the page within your account where you can download transactions.
- Select the account from which to download the transactions, and enter a start and end date for the download, and choose a file format.
- Choose which iBank account to save the transactions into (at the top right corner of the window).
- Initiate the download.
iBank's built-in browser does not accept popup windows. If your financial institution utilizes popups in order to download data, you will not be able to use iBank's browser. Download the data using another browser, then import it into iBank using File > Import.
Here is a sample download form from one bank's website:
When specifying a start and end date for the download, be sure to choose dates that are not likely to retrieve transactions that you have already imported into iBank. Although iBank will screen for duplicates automatically, it is best to avoid downloading duplicates in the first place.
If the OFX or QFX file format is available, choose one of those options as they contain the most comprehensive transaction data. If neither of those are available, choose QIF or CSV format.
Some banks provide several download options without specifying which file type each one uses. Generally speaking, "Microsoft Money" usually indicates OFX, "Quicken Web Connect" usually indicates QFX, and "Quicken" format usually indicates QIF. You do not actually need to own the software indicated to download a file in a particular format - just use the software name as a guide to determine the file type you need.
Once you have configured your download settings, choose which account to import the transactions into. Use the popup button at the top right corner of the window to pick one of your iBank accounts.
Now you're ready to begin the download! Click the download button on the web page, and iBank will automatically import the data when downloading is complete. If you chose the CSV format, you will be prompted to assign labels to the data columns (see File Import for more information). If you chose the QIF or CSV format and iBank cannot recognize the dates in the file, you will be asked to choose a date format before proceeding. Otherwise, iBank will import the new transactions, screen out any duplicates, mark all transactions "cleared" that were either imported or matched to incoming transactions, and apply import rules to clean and categorize the new transactions. A number will appear next to the account name in the source list to show you how many transactions were imported. To review the results of the import, see Using the Resolve View.
Merge duplicate transactions
To merge transactions from two different sources (for example, combining an imported transaction with one that was posted from a scheduled transaction), simply drag and drop one transaction onto the other. The resulting merged transaction will contain the details of the transaction onto which the other was dropped. To view the details of a transaction as they were originally imported, prior to matching, import rule processing, and manual merging, select the transaction and choose Transaction > Show Original Import Info.
Don't forget to log out
When you are finished downloading transactions from your financial institution, be sure to log out of your account, then select an account (or any other item) in iBank's source list to leave the browser.
Disable web download
To turn off web download for an account and remove the website shortcut from the source list, double-click the account to show the account inspector. Delete the contents of the "URL" field and click "Save." The website shortcut will be removed automatically and the account will no longer be configured to use web download.